INSTALLATION INSTRUCTIONS FOR THE TLR 45-90 KITS
See How To Make Templates: Click Here
Print Installation Instructions: Click Here
VIDEO INSTALLATION INSTRUCTIONS
READ ALONG INSTRUCTIONS
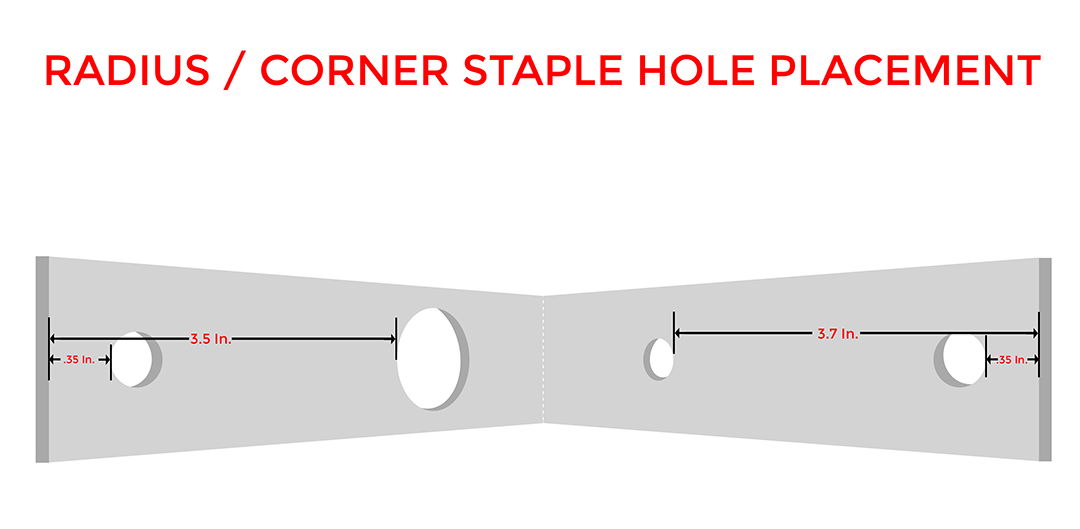
NOTE: Take a look at your Corner/Radius Staple. There are 4 holes. The three smaller sized holes are for anchor bolts, and the single larger hole is for the CAM.

STEP 1
• Using the provided template, trace around the outside of the template and mark cutouts along the crack approximately every 12 inches.
Note: It may help to pre-fold the staple at the centerline, as marked on the template.

Step 2
• Cut about an 18" area around the crack(s) using a masonry saw, wide enough to fit the staple with extra space on the side.
• Using a small hammer drill, carefully chip the plaster inside the wide-cut area.
Note: If the pool is already de-plastered, skip this step.

Step 3
• Using the provided templates, trace the perimeter of where the staples will be set.
• Repeat tracing the template every 12 inches along the crack.
• Using a masonry saw with a 4½" diamond blade, make a plunge cut into the structure along the marked lines, approximately 2 inches deep.
• Use a small hammer drill to chip out ~2" of plaster.

Step 4
• Center and hold the corner/radius staple in the cutout area.
• Use a pencil or crayon to trace and mark drill locations through the small holes of the staple.

Step 5
• At the furthest left anchor bolt hole, drill 4 inches deep using a ½"masonry bit.
Note: Drilling deeper will not affect performance.
• Clean the drilled hole.
• Tap the first anchor bolt into the hole.
• Place the staple over the bolt and secure it with a washer and hex nut using a ratchet. The staple should now be partially secured.

Step 6
• Drill through the two remaining small holes on the right side of the staple.
⚠️ DO NOT drill the large CAM hole yet!
• Clean the drilled holes.
• Insert two additional anchor bolts, and secure them with washers and hex nuts using a ratchet. The staple should now be fully secured and flush with the gunite structure.

Step 7
• Mark the location of the "ratchet hole" by placing the CAM bolt in the large hole. The ratchet hole should be facing toward the center of the staple.
• Drill at the marked location and clean the hole.
• Insert the CAM into the hole and adjust until it's fully seated in the staple.
Note: If the CAM does not align properly, use a larger drill bit to enlarge the hole slightly.
• Use the supplied epoxy to secure the post into the hole.

Step 8
• Set your torque wrench to 22 ft-lbs.
• Using a ⅜" ratchet attachment, tighten the CAM until the torque setting is reached.
⚠ IMPORTANT: If a second structural crack exists within 5 feet, torque staples to 12 ft-lbs instead.

Step 9
• Create a shallow "V-Cut" along the structural crack using a diamond or carbide blade.
• Clean out the crack of dust and debris.
• Use non-shrinking hydraulic cement to fill the cracks and cutouts.
• Trowel the cement tightly into place, ensuring no air pockets or voids are left.
• Once the repair is complete, you can apply your desired finish: plaster, paint, tile, marcite, cool deck, etc.